
 +91 9650860004
Water Level Measurement
Smart Water Level Measurement System Using Arduino Uno
🚀 Your Mission
Your mission is to build a smart water level measurement system using an Arduino Uno and an ultrasonic sensor.
You will transform a simple 2L bottle into a mini smart water tank that can measure how full it is and display the fill percentage.
🌎 Why This Matters
- Smart water tanks use similar technology to prevent overflow and track water usage.
- Factories use sensors to monitor liquid levels in large containers.
- Farm irrigation systems measure water levels automatically.
- Home automation systems can monitor resources and save energy.
🧠 Skills You Will Unlock
- Understanding how ultrasonic sensors measure distance.
- Connecting electronic components with an Arduino Uno.
- Writing Arduino code to read sensor data.
- Using calculations to convert measurements into useful information.
🧰 What You'll Need
| Component | Quantity |
|---|---|
| Arduino Uno | 1 |
| Ultrasonic Sensor (HC-SR04) | 1 |
| 2L Plastic Bottle | 1 |
| Breadboard | 1 |
| Jumper Wires | As required |
| USB Cable | 1 |
⚙️ How It Works
- A small opening is created on the top of the bottle so the ultrasonic sensor can measure the water level.
- The side of the bottle is marked with fill percentages to show how much water is inside.
- The ultrasonic sensor sends sound waves and measures the distance to the water surface.
- The Arduino Uno processes the sensor readings and calculates the water level percentage.
- The final fill percentage is displayed on the Serial Monitor.
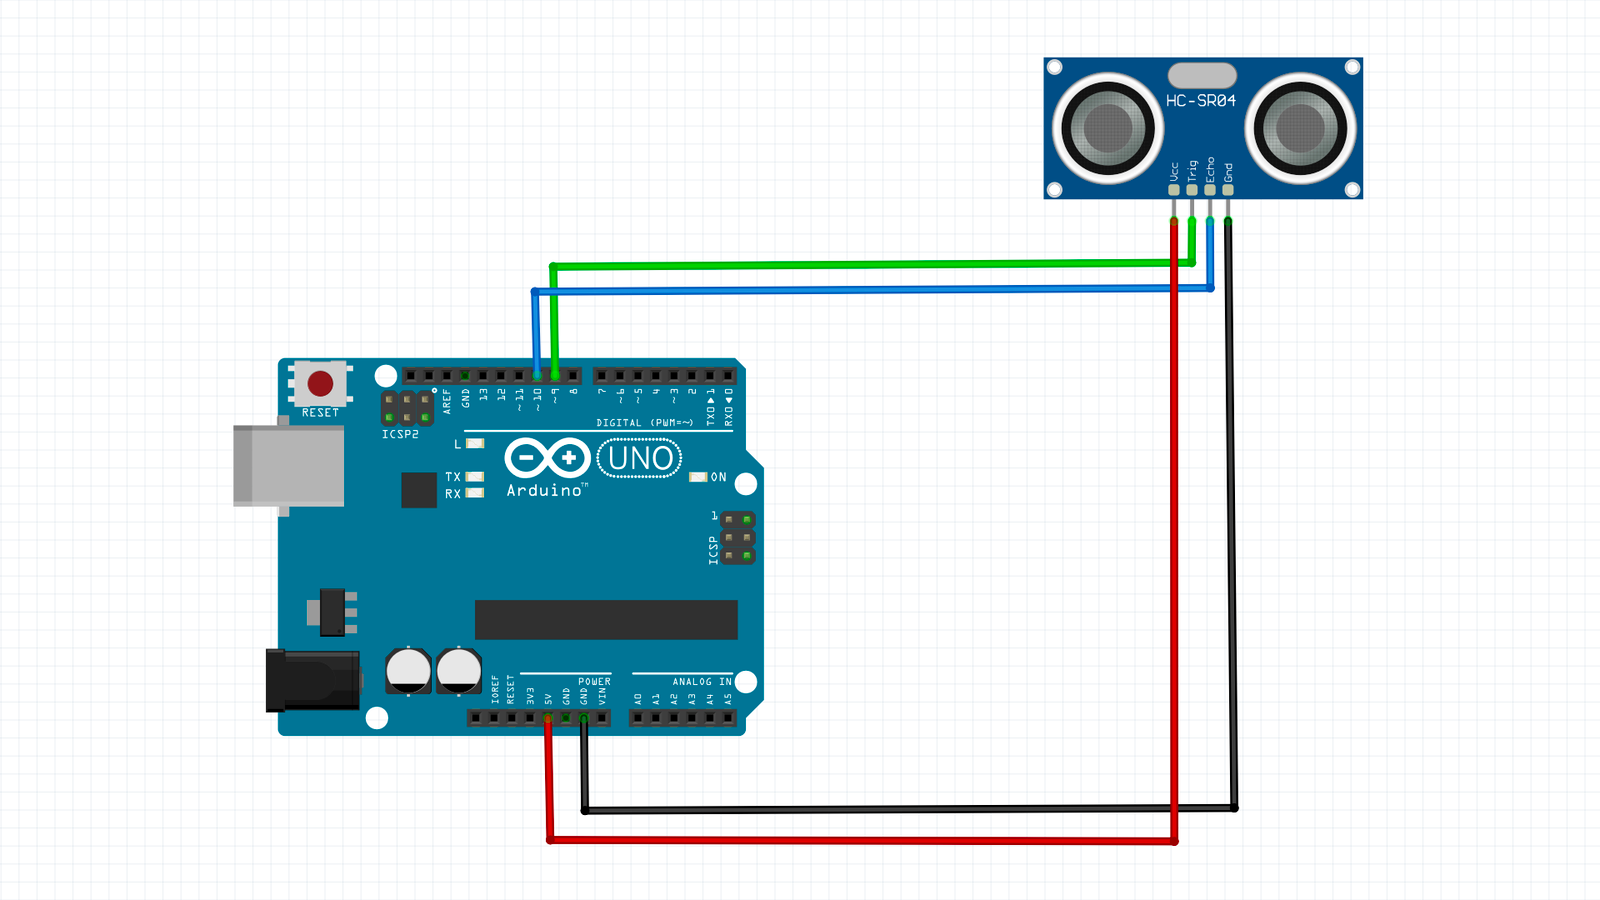
🔗 Wiring Connections
| Component Pin | Arduino Pin | Purpose |
|---|---|---|
| VCC | 5V | Provides power to the ultrasonic sensor. |
| GND | GND | Completes the electrical connection. |
| TRIG | Digital Pin 9 | Sends the ultrasonic pulse to measure distance. |
| ECHO | Digital Pin 10 | Receives the returning signal from the sensor. |
⚡ Circuit Overview
The ultrasonic sensor works like the eyes of your water level system. It sends out sound waves and measures how long they take to bounce back from the water surface. The Arduino Uno reads this information and uses it to calculate how full the bottle is.
The sensor needs power from the Arduino's 5V and GND pins. The TRIG and ECHO pins are connected to digital pins so the Arduino can send signals and receive measurements.
💡 Hardware Tips
- Make sure VCC and GND are connected correctly before powering your Arduino.
- Keep jumper wires firmly connected to avoid incorrect sensor readings.
- Place the ultrasonic sensor straight above the water surface for accurate measurements.
- Make clear percentage markings on the bottle so you can compare readings easily.
- Test the sensor using the Serial Monitor before attaching the final bottle setup.
🔌 Circuit Diagram
💻 Complete Arduino Code
Now it is time to program your water level measurement system! This Arduino code reads the ultrasonic sensor, checks the distance to the water, and shows the fill level on the Serial Monitor.
const int trigPin = 9;
const int echoPin = 10;

// ===== SET YOUR DISTANCES (in cm) =====
float level_100 = 4.0;   // FULL
float level_75  = 8.0;
float level_50  = 12.0;
float level_25  = 16.0;  // LOW

// Number of samples for averaging (for stability)
const int samples = 5;

long duration;
float distance;

// Function to get averaged distance
float getDistance() {
  float sum = 0;

  for (int i = 0; i < samples; i++) {
    // Trigger pulse
    digitalWrite(trigPin, LOW);
    delayMicroseconds(2);

    digitalWrite(trigPin, HIGH);
    delayMicroseconds(10);
    digitalWrite(trigPin, LOW);

    // Read echo
    duration = pulseIn(echoPin, HIGH, 30000); // timeout 30ms

    // Convert to distance
    float d = duration * 0.034 / 2;

    sum += d;
    delay(50);
  }

  return sum / samples;
}

void setup() {
  Serial.begin(9600);

  pinMode(trigPin, OUTPUT);
  pinMode(echoPin, INPUT);

  Serial.println("Water Level Monitoring System");
  Serial.println("-----------------------------");
}

void loop() {
  distance = getDistance();

  Serial.print("Distance: ");
  Serial.print(distance);
  Serial.println(" cm");

  // ===== WATER LEVEL LOGIC =====
  if (distance <= level_100) {
    Serial.println("Water Level: 100% (FULL)");
  }
  else if (distance <= level_75) {
    Serial.println("Water Level: 75%");
  }
  else if (distance <= level_50) {
    Serial.println("Water Level: 50%");
  }
  else if (distance <= level_25) {
    Serial.println("Water Level: 25%");
  }
  else if (distance > level_25 && distance < 400) {
    Serial.println("Water Level: BELOW 25% / EMPTY");
  }
  else {
    Serial.println("Sensor Error / Out of Range");
  }

  Serial.println("-----------------------------");
  delay(1000);
}
🧠 Code Explained
Variables
Variables store values that the Arduino uses while running the project. The trigPin and echoPin variables tell the Arduino where the ultrasonic sensor is connected. The level values store the distance ranges for different water percentages.
setup()
The setup() function runs once when the Arduino starts. It sets the sensor pins as input and output, starts the Serial Monitor, and displays the project name.
loop()
The loop() function runs continuously. It measures the water distance, checks which level range it matches, and prints the result on the Serial Monitor.
Calculations / Helper Functions
The getDistance() function takes multiple sensor readings and calculates an average. This makes the readings more stable and reduces small measurement errors.
📚 Key Concepts
- Variables store information like sensor values and settings.
- Functions help organize code into reusable blocks.
- Loops repeat instructions so the Arduino can keep monitoring water levels.
- if statements help the Arduino make decisions based on sensor readings.
- pulseIn() measures the time taken for the ultrasonic signal to return.
- The Serial Monitor displays live data from your Arduino.
🎉 Great Job!
Awesome work! 🎊 You've built a smart Arduino water level measurement system using an ultrasonic sensor. Your project can detect how full a container is and display the result in real time using the Serial Monitor.
🧠 What You Learned
- How an ultrasonic sensor measures distance.
- How to connect sensors to an Arduino Uno.
- How Arduino uses sensor data to make decisions.
- How to display live readings using the Serial Monitor.
- How robotics and electronics can solve real-world problems.
🏆 Next Challenges
- Easy: Add LEDs to show whether the bottle is Full, Half Full, or Low.
- Medium: Add a buzzer that sounds when the water level drops below 25%.
- Advanced: Upgrade the project with an OLED display or ESP32 to monitor water levels wirelessly.
📤 Submit Your Project
Ready to show off your project? Follow these simple steps:
- Record a short video demonstrating your project.
- Show the bottle at different water levels and the percentage changing on the Serial Monitor.
- Upload the video to YouTube as Public or Unlisted.
- Copy the YouTube link and paste it into the submission form below.
[Submission Form Placeholder]
🔒 Note: Students must be signed in before submitting their project.