
 +91 9650860004
Distance Measurement
Measure distance to objects using an Ultrasonic Sensor
🎥 Project Video
🚀 Your Mission
Your mission is to build a distance measurement system using an Arduino Uno and an ultrasonic sensor. Mount the sensor on a 3D printed stand, or create your own stand from cardboard, then watch it measure how far away objects are.
As objects move closer or farther away, the measured distance changes instantly. You'll explore Arduino, electronics, sensors, and coding while building a fun DIY robotics project.
🌎 Why This Matters
- Robots use distance sensors to avoid obstacles.
- Automatic doors detect when people are nearby.
- Parking assistance systems measure the distance to objects.
- Warehouse automation uses sensors to detect boxes and equipment.
- Smart devices use ultrasonic sensors for accurate distance measurement.
🧠 Skills You Will Unlock
- Building an Arduino sensor circuit
- Using an ultrasonic sensor to measure distance
- Reading data from the Serial Monitor
- Testing and debugging electronics projects
- Creating a simple robotics sensing system
🧰 What You'll Need
| Component | Quantity |
|---|---|
| Arduino Uno | 1 |
| Ultrasonic Sensor (HC-SR04) | 1 |
| Jumper Wires | 4 |
| Breadboard | 1 |
| 3D Printed Sensor Stand or Cardboard Stand | 1 |
⚙️ How It Works
- Mount the ultrasonic sensor on a 3D printed stand or a sturdy cardboard stand.
- Connect the sensor to the Arduino Uno and power the circuit.
- The sensor sends out an ultrasonic sound wave and waits for the echo to return.
- The Arduino calculates the distance based on the time taken for the echo to come back.
- Open the Serial Monitor and move objects closer or farther away to see the distance update in real time.
🔌 Circuit Diagram
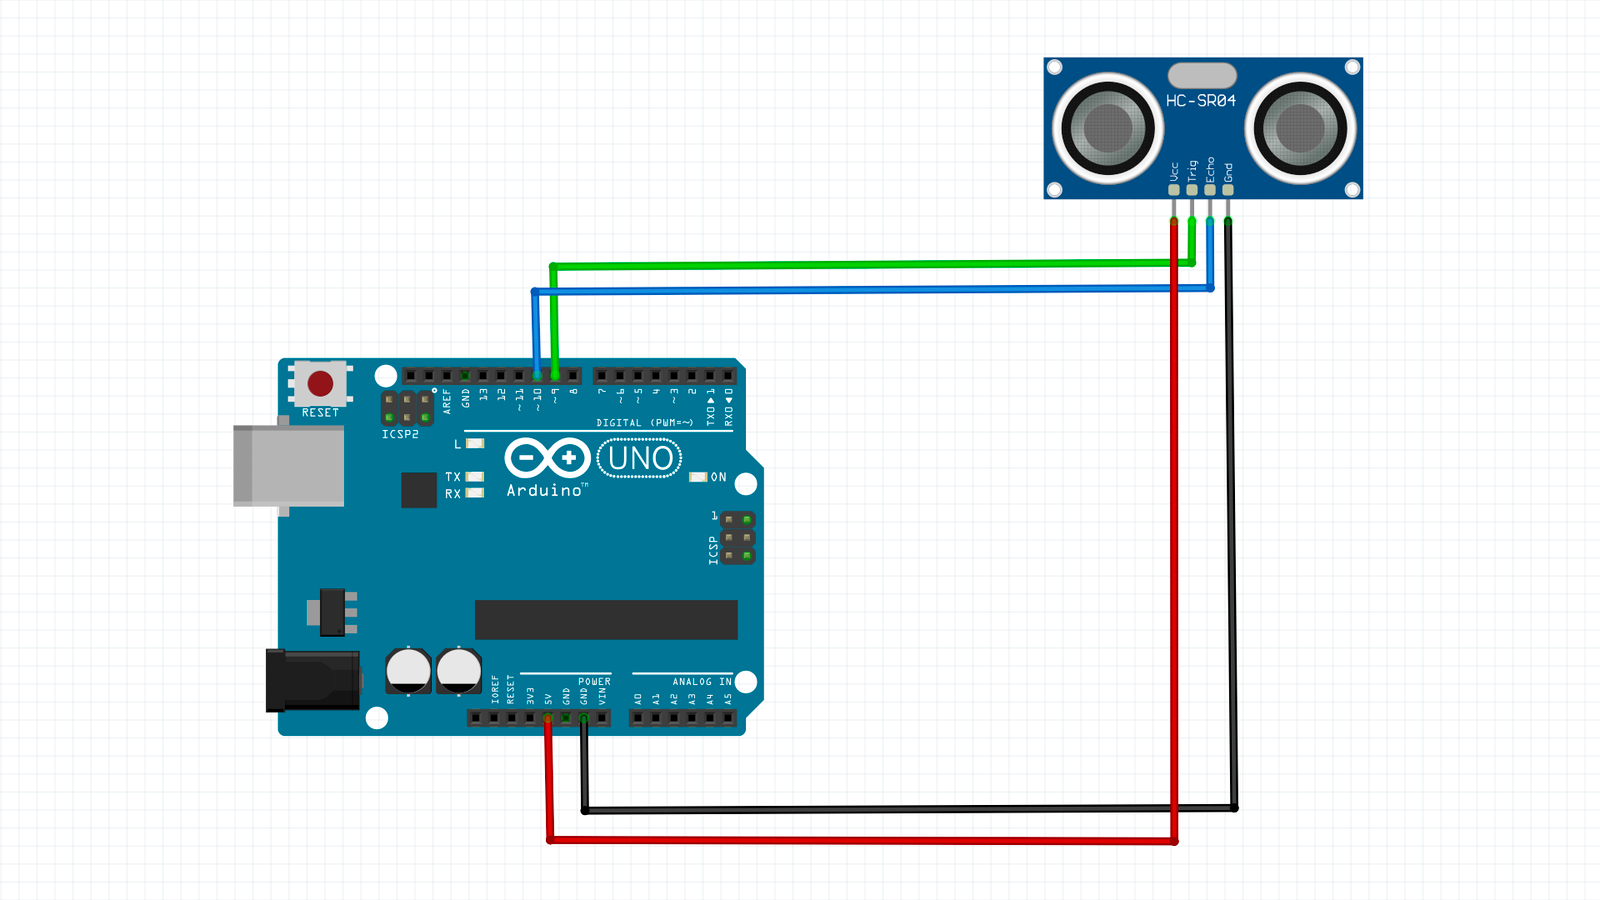
🔗 Wiring Connections
| Component Pin | Arduino Pin | Purpose |
|---|---|---|
| VCC | 5V | Powers the ultrasonic sensor |
| GND | GND | Provides the ground connection |
| TRIG | Digital Pin 9 | Sends the ultrasonic pulse |
| ECHO | Digital Pin 10 | Receives the reflected pulse |
⚡ Circuit Overview
The Arduino sends a short pulse through the TRIG pin. The ultrasonic sensor measures how long the echo takes to return through the ECHO pin, and the Arduino calculates the distance before displaying it in the Serial Monitor.
💡 Hardware Tips
- Double-check that TRIG is connected to pin 9 and ECHO to pin 10.
- Keep the sensor facing straight ahead for accurate measurements.
- Test with a flat object placed 10–50 cm from the sensor first.
- If the readings are unstable, check all jumper wire connections and make sure the sensor is firmly mounted.
Arduino Code
const int trigPin = 9;
const int echoPin = 10;

long duration;
float distance;

void setup() {
  Serial.begin(9600);
  pinMode(trigPin, OUTPUT);
  pinMode(echoPin, INPUT);
}

void loop() {
  // Clear trigPin
  digitalWrite(trigPin, LOW);
  delayMicroseconds(2);

  // Send 10us pulse
  digitalWrite(trigPin, HIGH);
  delayMicroseconds(10);
  digitalWrite(trigPin, LOW);

  // Read echo time
  duration = pulseIn(echoPin, HIGH);

  // Calculate distance in cm
  distance = duration * 0.034 / 2;

  // Display on Serial Monitor
  Serial.print("Distance: ");
  Serial.print(distance);
  Serial.println(" cm");

  delay(500);
}🎉 Great Job!
Fantastic work! You built an Arduino distance measurement system using an ultrasonic sensor. Your project can detect how close or far away an object is and display the distance in the Serial Monitor.
🧠 What You Learned
- How to connect an ultrasonic sensor to an Arduino Uno.
- How ultrasonic sensors measure distance using sound waves.
- How to read live sensor data in the Serial Monitor.
- How distance changes as objects move closer or farther away.
- How sensors are used in robotics and automation projects.
🏆 Next Challenges
- Easy: Add an LED that lights up when an object is closer than 20 cm.
- Medium: Add a buzzer that beeps faster as an object gets closer.
- Advanced: Display the measured distance on an OLED or LCD screen.
📤 Submit Your Project
- Record a short demonstration video of your project.
- Upload the video to YouTube as Public or Unlisted.
- Copy the YouTube video link.
- Paste the link into the submission form.
[Submission Form Placeholder]
Note: Students must be signed in before submitting their project.