
 +91 9650860004
Smart Garage Door
🎥 Project Video
🚀 Your Mission
Your mission is to build a Smart Garage Door that opens automatically when a car or object comes close. Using an Arduino, an ultrasonic sensor, and a servo motor, you'll create a miniature version of the automatic garage doors used every day.
By the end of this project, your garage door will detect nearby objects, open smoothly, and close again when the path is clear. It's a fun introduction to robotics, automation, and smart electronics!
🌎 Why This Matters
- Automatic garage doors at homes.
- Parking garage entry systems.
- Security gates for offices and apartments.
- Warehouse loading doors.
- Smart home automation projects.
🧠 Skills You Will Unlock
- Using an ultrasonic sensor to measure distance.
- Controlling a servo motor with Arduino.
- Building a simple automation system.
- Reading live sensor data.
- Combining hardware and coding to solve real-world problems.
🧰 What You'll Need
| Component | Quantity |
|---|---|
| Arduino Uno | 1 |
| Ultrasonic Sensor (HC-SR04) | 1 |
| Servo Motor (SG90 or similar) | 1 |
| Breadboard | 1 |
| Jumper Wires | Several |
| USB Cable | 1 |
| Cardboard (for the garage) | 1 |
⚙️ How It Works
- Build a small garage using cardboard and attach the servo motor to the garage door.
- Mount the ultrasonic sensor at the front so it can detect approaching objects.
- The sensor continuously measures the distance in front of the garage.
- When an object comes within the set distance, the Arduino tells the servo motor to open the door.
- When the object moves away, the Arduino closes the garage door automatically, ready for the next vehicle.
🔌 Circuit Diagram
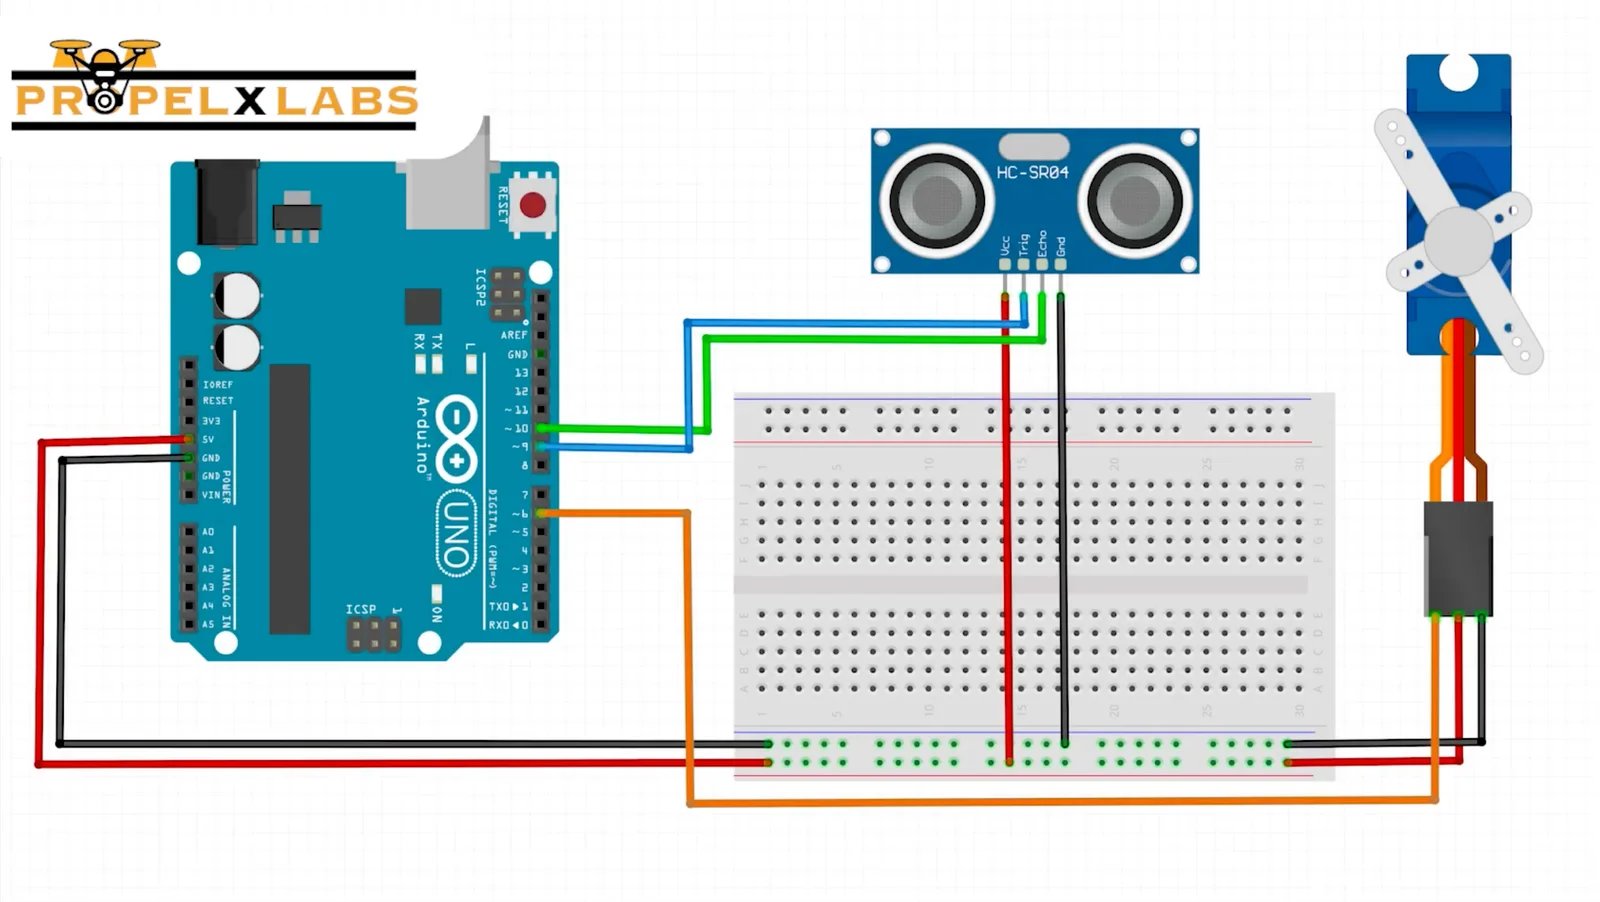
🔗 Wiring Connections
| Component Pin | Arduino Pin | Purpose |
|---|---|---|
| Ultrasonic VCC | 5V | Powers the ultrasonic sensor. |
| Ultrasonic GND | GND | Completes the circuit. |
| Ultrasonic TRIG | Digital Pin 9 | Sends the ultrasonic pulse. |
| Ultrasonic ECHO | Digital Pin 10 | Receives the reflected pulse. |
| Servo Signal | Digital Pin 6 | Controls the garage door movement. |
| Servo VCC | 5V | Provides power to the servo motor. |
| Servo GND | GND | Common ground for the servo motor. |
⚡ Circuit Overview
The ultrasonic sensor acts as the garage's eyes, constantly checking if something is approaching. When it detects an object nearby, the Arduino processes the distance reading and tells the servo motor to open the garage door. Once the area is clear, the Arduino rotates the servo back to close the door.
💡 Hardware Tips
- Mount the ultrasonic sensor so it faces straight ahead for accurate detection.
- Secure the servo motor firmly to the cardboard so it can move the door smoothly.
- Make sure all components share a common GND connection.
- Check that the servo arm can rotate freely without hitting the garage walls.
- Test the servo movement before attaching the garage door to avoid damaging the motor.