
 +91 9650860004
Height Measurement
Measure your height without using a tape measure.
🎥 Project Video
🚀 Your Mission
Your mission is to build a smart height measurement system using an Arduino Uno and an ultrasonic sensor. Mount the sensor 6 feet above the ground on a 3D printed stand or a sturdy cardboard mount, then measure a person's height automatically.
When someone stands under the sensor, it measures the distance to the top of their head. The Arduino calculates their height and displays the result in the Serial Monitor, just like an automatic height scanner.
🌎 Why This Matters
- Hospitals and clinics use height measurement during health checkups.
- Schools measure students' height for health records.
- Fitness centers track height as part of body measurements.
- Smart kiosks use sensors to collect measurements automatically.
- Robotics and automation systems use distance sensors to detect people and objects.
🧠 Skills You Will Unlock
- Building an Arduino sensor project
- Using an ultrasonic sensor for distance measurement
- Calculating height from sensor readings
- Viewing live data in the Serial Monitor
- Testing and calibrating a robotics system
🧰 What You'll Need
| Component | Quantity |
|---|---|
| Arduino Uno | 1 |
| Ultrasonic Sensor (HC-SR04) | 1 |
| Jumper Wires | 4 |
| Breadboard | 1 |
| 3D Printed Mount or Cardboard Stand | 1 |
⚙️ How It Works
- Mount the ultrasonic sensor exactly 6 feet above the ground using a 3D printed stand or a cardboard mount.
- Connect the sensor to the Arduino and power up the circuit.
- When a person stands below the sensor, it measures the distance to the top of their head.
- The Arduino subtracts this distance from the mounting height to calculate the person's height.
- Open the Serial Monitor to view the measured height and test with people of different heights.
🔌 Circuit Diagram
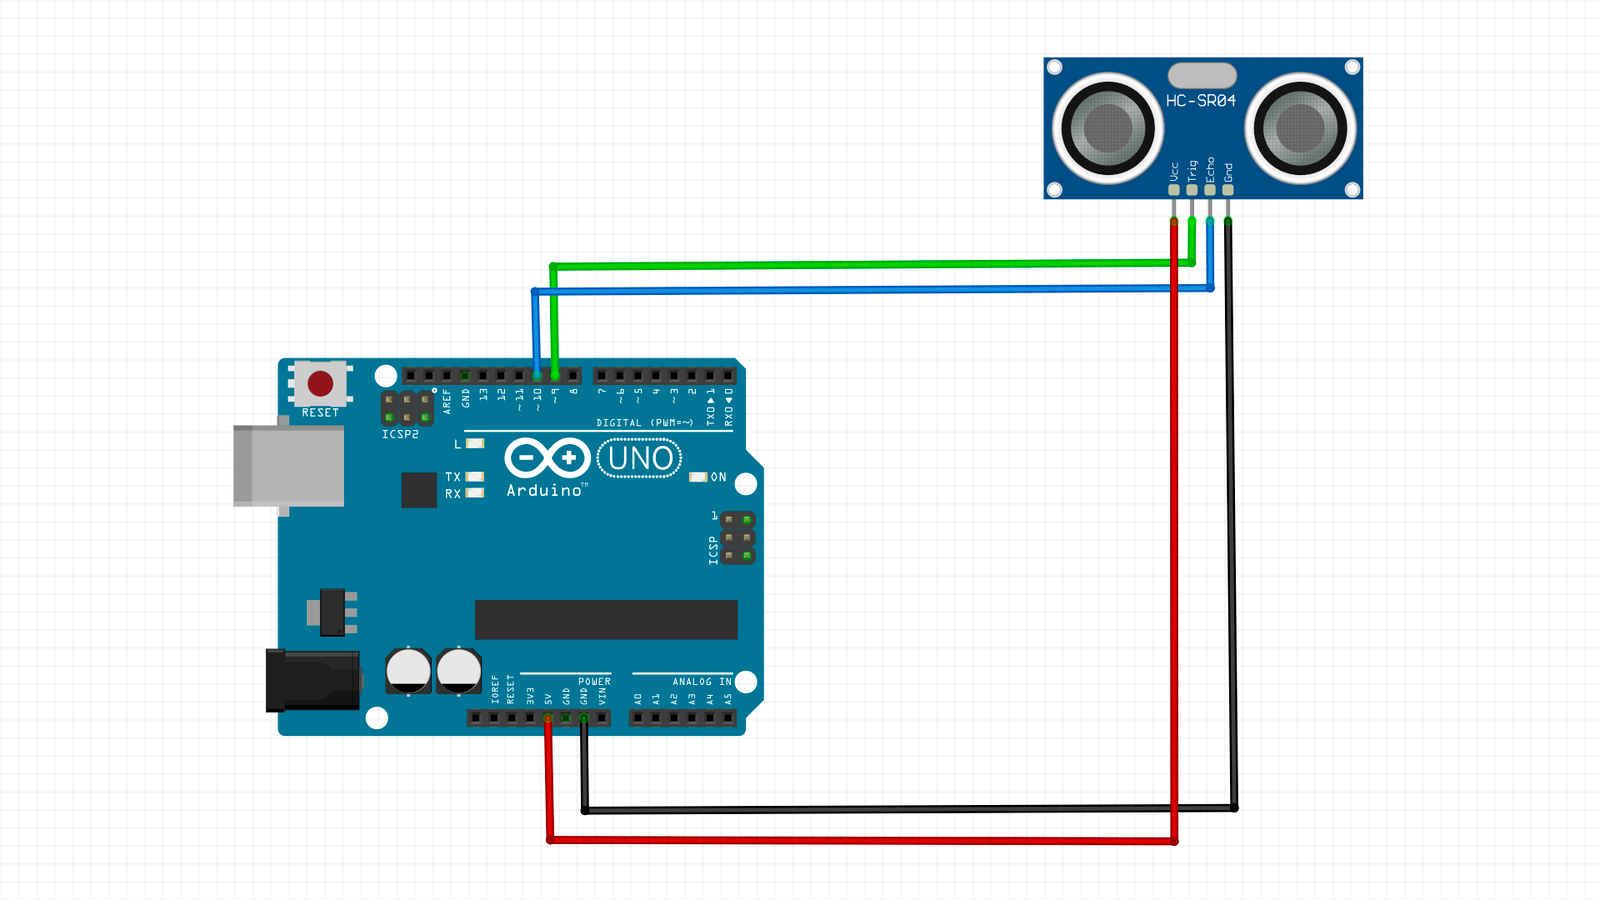
🔗 Wiring Connections
| Component Pin | Arduino Pin | Purpose |
|---|---|---|
| VCC | 5V | Powers the ultrasonic sensor |
| GND | GND | Provides the ground connection |
| TRIG | Digital Pin 9 | Sends the ultrasonic pulse |
| ECHO | Digital Pin 10 | Receives the reflected pulse |
⚡ Circuit Overview
Mount the ultrasonic sensor 6 feet above the ground so it points straight down. The Arduino triggers the sensor through the TRIG pin, receives the echo on the ECHO pin, and calculates a person's height from the measured distance.
💡 Hardware Tips
- Mount the sensor securely so it does not move during measurements.
- Measure the mounting height accurately before running the project.
- Keep the sensor facing straight down for the best results.
- Make sure TRIG is connected to pin 9 and ECHO to pin 10.
- Ask the person to stand still directly below the sensor while measuring.
#define TRIG_PIN 9
#define ECHO_PIN 10

const float MOUNT_HEIGHT_CM = 195.88;  // 6 feet

long duration;
float distanceCm;
float heightCm;

void setup() {
  pinMode(TRIG_PIN, OUTPUT);
  pinMode(ECHO_PIN, INPUT);

  Serial.begin(9600);
  Serial.println("Ultrasonic Height Measurement Tool");
}

void loop() {
  // Trigger pulse
  digitalWrite(TRIG_PIN, LOW);
  delayMicroseconds(2);
  digitalWrite(TRIG_PIN, HIGH);
  delayMicroseconds(10);
  digitalWrite(TRIG_PIN, LOW);

  // Read echo
  duration = pulseIn(ECHO_PIN, HIGH, 30000);

  if (duration == 0) {
    Serial.println("No object detected");
    delay(500);
    return;
  }

  distanceCm = (duration * 0.0343) / 2;
  heightCm = MOUNT_HEIGHT_CM - distanceCm;

  // Basic sanity check
  if (heightCm < 50 || heightCm > 210) {
    Serial.println("Out of human height range");
  } else {
    int feet = heightCm / 30.48;
    int inches = (heightCm - (feet * 30.48)) / 2.54;

    Serial.print("Height: ");
    Serial.print(heightCm, 1);
    Serial.print(" cm  (");
    Serial.print(feet);
    Serial.print(" ft ");
    Serial.print(inches);
    Serial.println(" in)");
  }

  delay(500);
}
🧠 Code Explained
Variables
The program defines the TRIG and ECHO pins connected to the ultrasonic sensor. The MOUNT_HEIGHT_CM variable stores the sensor height of 195.88 cm, which is used to calculate the person's height.
Other variables store the echo time, measured distance, and final height calculation. These values change as different people stand below the sensor.
setup()
The setup() function runs once when the Arduino starts. It sets the TRIG pin as an output, the ECHO pin as an input, and starts communication with the Serial Monitor.
loop()
The loop() function repeatedly sends an ultrasonic pulse and waits for the echo to return. The Arduino uses this information to measure the distance from the sensor to the top of a person's head.
The measured distance is subtracted from the sensor mounting height to find the person's height. The result is displayed in centimeters and converted into feet and inches.
Calculations / Helper Functions
The pulseIn() function measures the time taken for the ultrasonic echo to return. The program converts this time into distance using the speed of sound formula.
The height calculation uses the formula: Height = Mounting Height - Sensor Distance. A check is included to ignore measurements outside a normal human height range.
📚 Key Concepts
- Variables store sensor readings and calculated values.
- Functions organize the Arduino program into clear sections.
- Ultrasonic sensors measure distance using sound waves.
- Serial Monitor displays live height measurements.
- if statements check whether measurements are valid.
- Mathematical calculations convert distance into height.
🎉 Great Job!
Amazing work! You built a smart height measurement system using an Arduino Uno and an ultrasonic sensor. Your project can measure a person's height automatically using distance sensing and coding.
🧠 What You Learned
- How ultrasonic sensors measure distance using sound waves.
- How to connect and control a sensor using Arduino.
- How to calculate height from a measured distance.
- How to display live sensor data using the Serial Monitor.
- How robotics and automation use sensors to solve real-world problems.
🏆 Next Challenges
- Easy: Add an LED indicator that turns on when someone is detected.
- Medium: Add a display screen to show the height without using a computer.
- Advanced: Create a smart height tracking system that stores measurements and connects to the internet.
📤 Submit Your Project
- Record a short demonstration video showing your height measurement project working.
- Upload the video to YouTube as Public or Unlisted.
- Copy the YouTube video link.
- Paste the link into the submission form.
[Submission Form Placeholder]
Students must be signed in before submitting their project.