
 +91 9650860004
Buzzer Music
Produce Musical Notes Using a Buzzer - Play Happy Birthday Song
🎥 Project Video
🚀 Your Mission
Your mission is to make an Arduino Uno play the famous Happy Birthday tune using a buzzer. You will build a fun DIY project and use Tinkercad block coding to create music without writing text-based code.
As you complete this robotics and STEM challenge, you will discover how electronics use different sound frequencies to create melodies. When your circuit is ready, celebrate by playing your own birthday song!
🌎 Why This Matters
- Doorbells and alarms use buzzers to play sounds.
- Robotics projects use buzzers for alerts and notifications.
- Automation systems use sound to warn users about important events.
- Electronic toys and games create music using small speakers or buzzers.
- STEM and coding projects use buzzers to learn about sound and electronics.
🧠 Skills You Will Unlock
- Building a simple Arduino circuit
- Using Tinkercad block coding
- Connecting a buzzer correctly
- Understanding musical notes and timing
- Testing and debugging an electronics project
🧰 What You'll Need
| Component | Quantity |
|---|---|
| Arduino Uno | 1 |
| Buzzer | 1 |
| Jumper Wires | 2 |
| Breadboard (optional) | 1 |
⚙️ How It Works
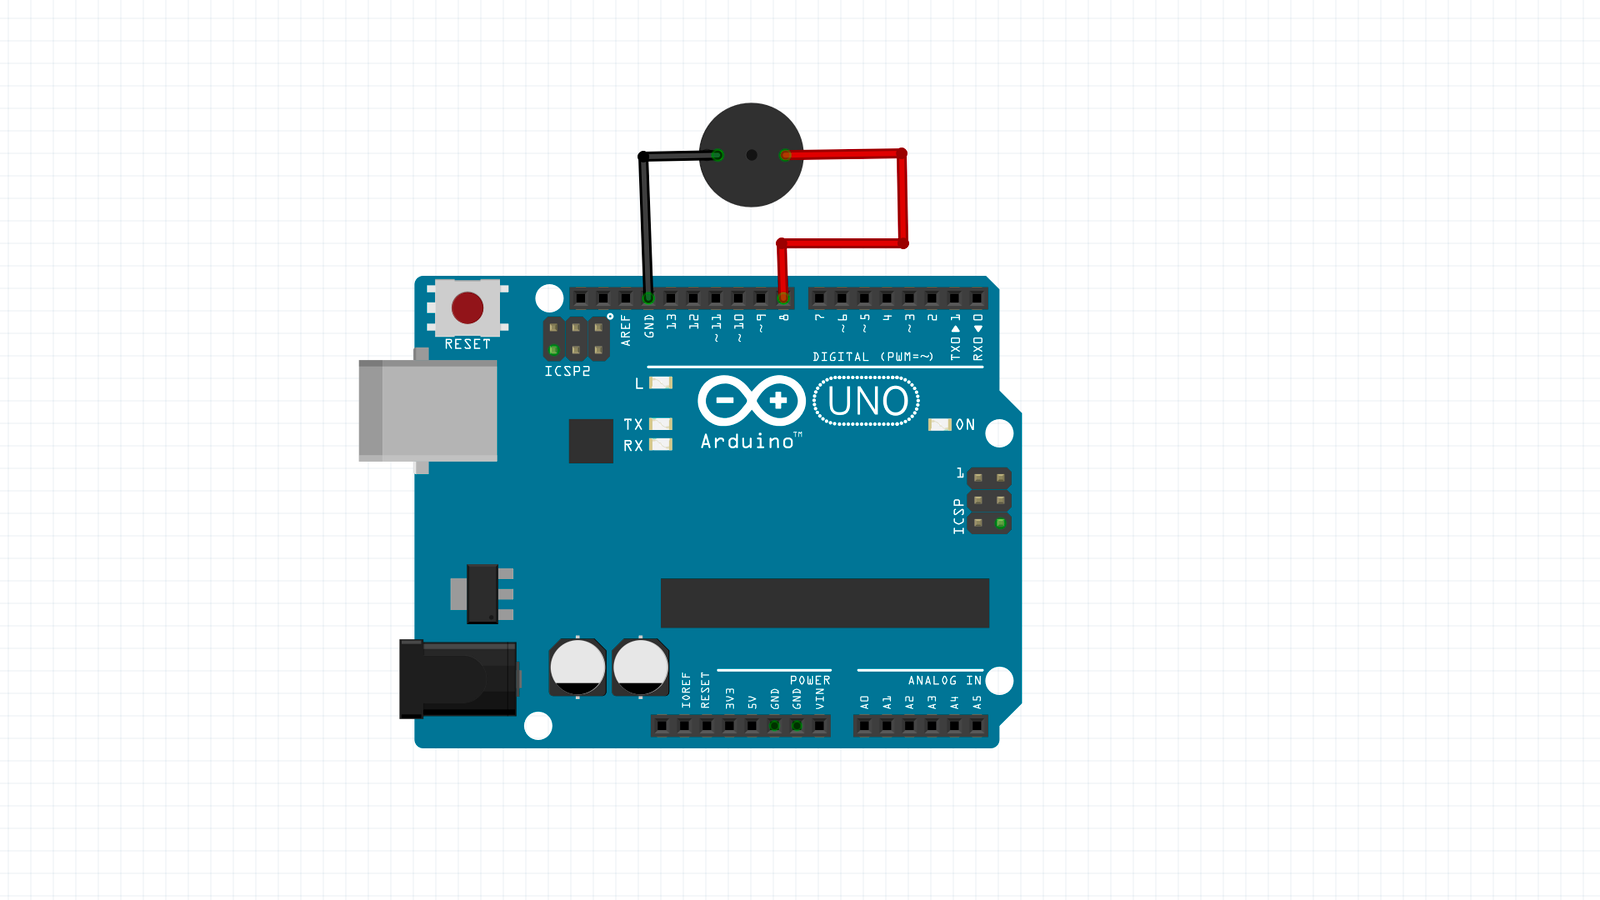
- Connect the buzzer between Arduino pin 8 and GND to complete the circuit.
- Open Tinkercad and create the circuit with the Arduino and buzzer.
- Use the block coding editor to build the sequence of musical notes for Happy Birthday.
- Start the simulation and listen carefully to the melody played by the buzzer.
- Adjust the note timing if needed until the tune sounds smooth and recognizable.
Hardware Setup
To connect the buzzer to the Arduino Uno, you'll need:
- Active buzzer module x 1
- Male-to-female jumper wires x 2
Wiring
- Connect Arduino GND pin to the – (negative) pin on the buzzer using black male-to-female jumper wire.
- Connect digital pin 8 on the Arduino to the + (positive) pin on the buzzer using the red male-to-female jumper wire.
// Arduino code

int C4 = 0;
int D4 = 0;
int E4 = 0;
int F4 = 0;
int G4 = 0;
int Bb4 = 0;
int C5 = 0;
int Note_A4 = 0;
int Note_Aa = 0;

void setup()
{
  pinMode(8, OUTPUT);

  C4 = 48;
  D4 = 50;
  E4 = 52;
  F4 = 53;
  G4 = 55;
  Note_A4 = 57;
  Note_Aa = 58;
  Bb4 = 59;
  C5 = 60;
}

void loop()
{
  // 1st paragraph
  tone(8, 440 * pow(2.0, (constrain(int(C4), 35, 127) - 57) / 12.0), 250);
  delay(300); // Wait for 300 millisecond(s)
  tone(8, 440 * pow(2.0, (constrain(int(C4), 35, 127) - 57) / 12.0), 250);
  delay(300); // Wait for 300 millisecond(s)
  tone(8, 440 * pow(2.0, (constrain(int(D4), 35, 127) - 57) / 12.0), 500);
  delay(550); // Wait for 550 millisecond(s)
  tone(8, 440 * pow(2.0, (constrain(int(C4), 35, 127) - 57) / 12.0), 500);
  delay(550); // Wait for 550 millisecond(s)
  tone(8, 440 * pow(2.0, (constrain(int(F4), 35, 127) - 57) / 12.0), 500);
  delay(550); // Wait for 550 millisecond(s)
  tone(8, 440 * pow(2.0, (constrain(int(E4), 35, 127) - 57) / 12.0), 1000);
  delay(1050); // Wait for 1050 millisecond(s)
  // 2nd paragraph
  tone(8, 440 * pow(2.0, (constrain(int(C4), 35, 127) - 57) / 12.0), 250);
  delay(300); // Wait for 300 millisecond(s)
  tone(8, 440 * pow(2.0, (constrain(int(C4), 35, 127) - 57) / 12.0), 250);
  delay(300); // Wait for 300 millisecond(s)
  tone(8, 440 * pow(2.0, (constrain(int(D4), 35, 127) - 57) / 12.0), 500);
  delay(550); // Wait for 550 millisecond(s)
  tone(8, 440 * pow(2.0, (constrain(int(C4), 35, 127) - 57) / 12.0), 500);
  delay(550); // Wait for 550 millisecond(s)
  tone(8, 440 * pow(2.0, (constrain(int(G4), 35, 127) - 57) / 12.0), 500);
  delay(550); // Wait for 550 millisecond(s)
  tone(8, 440 * pow(2.0, (constrain(int(E4), 35, 127) - 57) / 12.0), 1000);
  delay(1050); // Wait for 1050 millisecond(s)
  // 3rd paragraph
  tone(8, 440 * pow(2.0, (constrain(int(C4), 35, 127) - 57) / 12.0), 250);
  delay(300); // Wait for 300 millisecond(s)
  tone(8, 440 * pow(2.0, (constrain(int(C4), 35, 127) - 57) / 12.0), 250);
  delay(300); // Wait for 300 millisecond(s)
  tone(8, 440 * pow(2.0, (constrain(int(C5), 35, 127) - 57) / 12.0), 500);
  delay(550); // Wait for 550 millisecond(s)
  tone(8, 440 * pow(2.0, (constrain(int(Note_A4), 35, 127) - 57) / 12.0), 500);
  delay(550); // Wait for 550 millisecond(s)
  tone(8, 440 * pow(2.0, (constrain(int(F4), 35, 127) - 57) / 12.0), 500);
  delay(550); // Wait for 550 millisecond(s)
  tone(8, 440 * pow(2.0, (constrain(int(E4), 35, 127) - 57) / 12.0), 500);
  delay(550); // Wait for 550 millisecond(s)
  tone(8, 440 * pow(2.0, (constrain(int(D4), 35, 127) - 57) / 12.0), 1000);
  delay(1050); // Wait for 1050 millisecond(s)
  // 4th paragraph
  tone(8, 440 * pow(2.0, (constrain(int(Note_Aa), 35, 127) - 57) / 12.0), 250);
  delay(300); // Wait for 300 millisecond(s)
  tone(8, 440 * pow(2.0, (constrain(int(Note_Aa), 35, 127) - 57) / 12.0), 250);
  delay(300); // Wait for 300 millisecond(s)
  tone(8, 440 * pow(2.0, (constrain(int(Note_A4), 35, 127) - 57) / 12.0), 500);
  delay(550); // Wait for 550 millisecond(s)
  tone(8, 440 * pow(2.0, (constrain(int(F4), 35, 127) - 57) / 12.0), 500);
  delay(550); // Wait for 550 millisecond(s)
  tone(8, 440 * pow(2.0, (constrain(int(G4), 35, 127) - 57) / 12.0), 500);
  delay(550); // Wait for 550 millisecond(s)
  tone(8, 440 * pow(2.0, (constrain(int(F4), 35, 127) - 57) / 12.0), 1000);
  delay(1050); // Wait for 1050 millisecond(s)
}
🧠 Code Explained
Variables
The note variables (C4, D4, E4, F4, G4, A4, A#4, Bb4 and C5) store musical note values. These values are used to generate the correct sound frequencies for the buzzer.
setup()
The setup() function runs once when the Arduino starts. It sets pin 8 as an output and assigns values to all the musical notes used in the melody.
loop()
The loop() function plays the Happy Birthday song by sending each note to the buzzer with the tone() function. Delays are added between notes to create the correct rhythm, and the song repeats continuously.
Helper Functions
The tone() function produces sound on the buzzer, while delay() controls the timing between notes. The pow() function calculates the correct frequency for each musical note before it is played.
🎉 Great Job!
Awesome work! You built an Arduino music player that performs the Happy Birthday tune using a buzzer. You also explored coding, electronics, and how different sound frequencies create music.
🧠 What You Learned
- How to connect a buzzer to an Arduino Uno.
- How to use Tinkercad to build and simulate an electronics project.
- How musical notes are played using the tone() function.
- How delays control the rhythm and timing of a melody.
- How coding and robotics work together to create interactive DIY projects.
🏆 Next Challenges
- Easy: Change the melody to play a different song.
- Medium: Add an LED that blinks in time with each note.
- Advanced: Add push buttons to let users choose between multiple songs.
📤 Submit Your Project
- Record a short demonstration video of your project.
- Upload the video to YouTube as Public or Unlisted.
- Copy the YouTube video link.
- Paste the link into the submission form.
[Submission Form Placeholder]
Note: Students must be signed in before submitting their project.