
 +91 9650860004
Automatic Barrier
Smart Automatic Barrier Gate using Arduino & Ultrasonic Sensor
Introduction
Hello learners, welcome back to PropelX Labs!
In this project, we are going to build a Smart Automatic Barrier Gate System that feels like something you would actually see at parking entrances or society gates. The interesting part is that it works completely on its own using an Arduino Uno, an ultrasonic sensor, and a servo motor.
The idea is simple but powerful. Whenever something comes close to the gate—like a vehicle or even your hand—the system detects it and automatically opens the barrier. Once the object moves away, the gate closes again without any manual control.
This kind of automation is the foundation of modern smart systems, and it is widely used in parking management, security checkpoints, and entry control systems.
How the System Thinks
Instead of being controlled by a person, this system behaves like it is “watching” the distance in front of it. The ultrasonic sensor continuously sends signals and checks how far an object is.
When the distance becomes smaller than a fixed limit, the Arduino understands that something is approaching and immediately tells the servo motor to rotate and open the gate. When nothing is detected nearby, the system slowly brings the gate back to its closed position.
So in simple terms, the system behaves like this: When something comes close, it reacts. When the area is clear, it resets itself.
Building the Physical Setup
Before we jump into wiring and coding, we first need to create the physical structure of the barrier gate. This part is where your creativity comes in. You can use cardboard, acrylic, or even a 3D printed arm depending on what you have available.
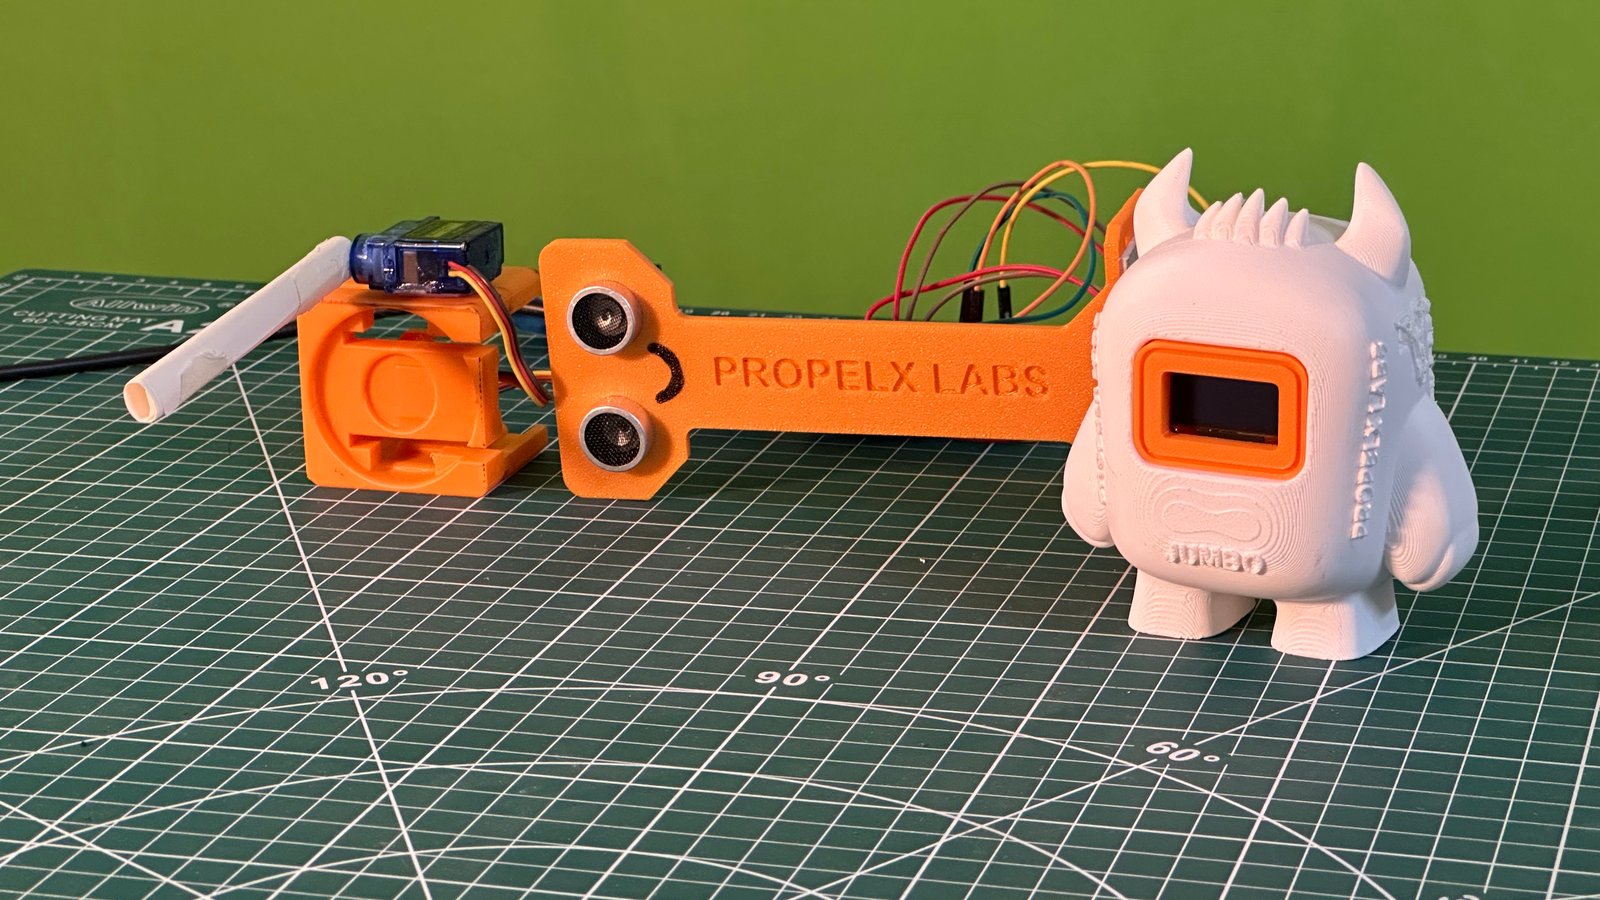
The only important thing is that the barrier arm should be light enough so that the servo motor can move it easily without strain. Once the structure is ready, the servo motor is fixed firmly at the base so it can act as the pivot point for the gate movement.
After that, the ultrasonic sensor is placed at the front side of the gate. It should face outward so it can clearly “see” any object approaching the system. This positioning is very important because it directly affects detection accuracy.
Finally, the Arduino Uno is placed nearby, acting as the brain of the entire setup.
Understanding the Connections
Now comes the most important part—wiring everything correctly.
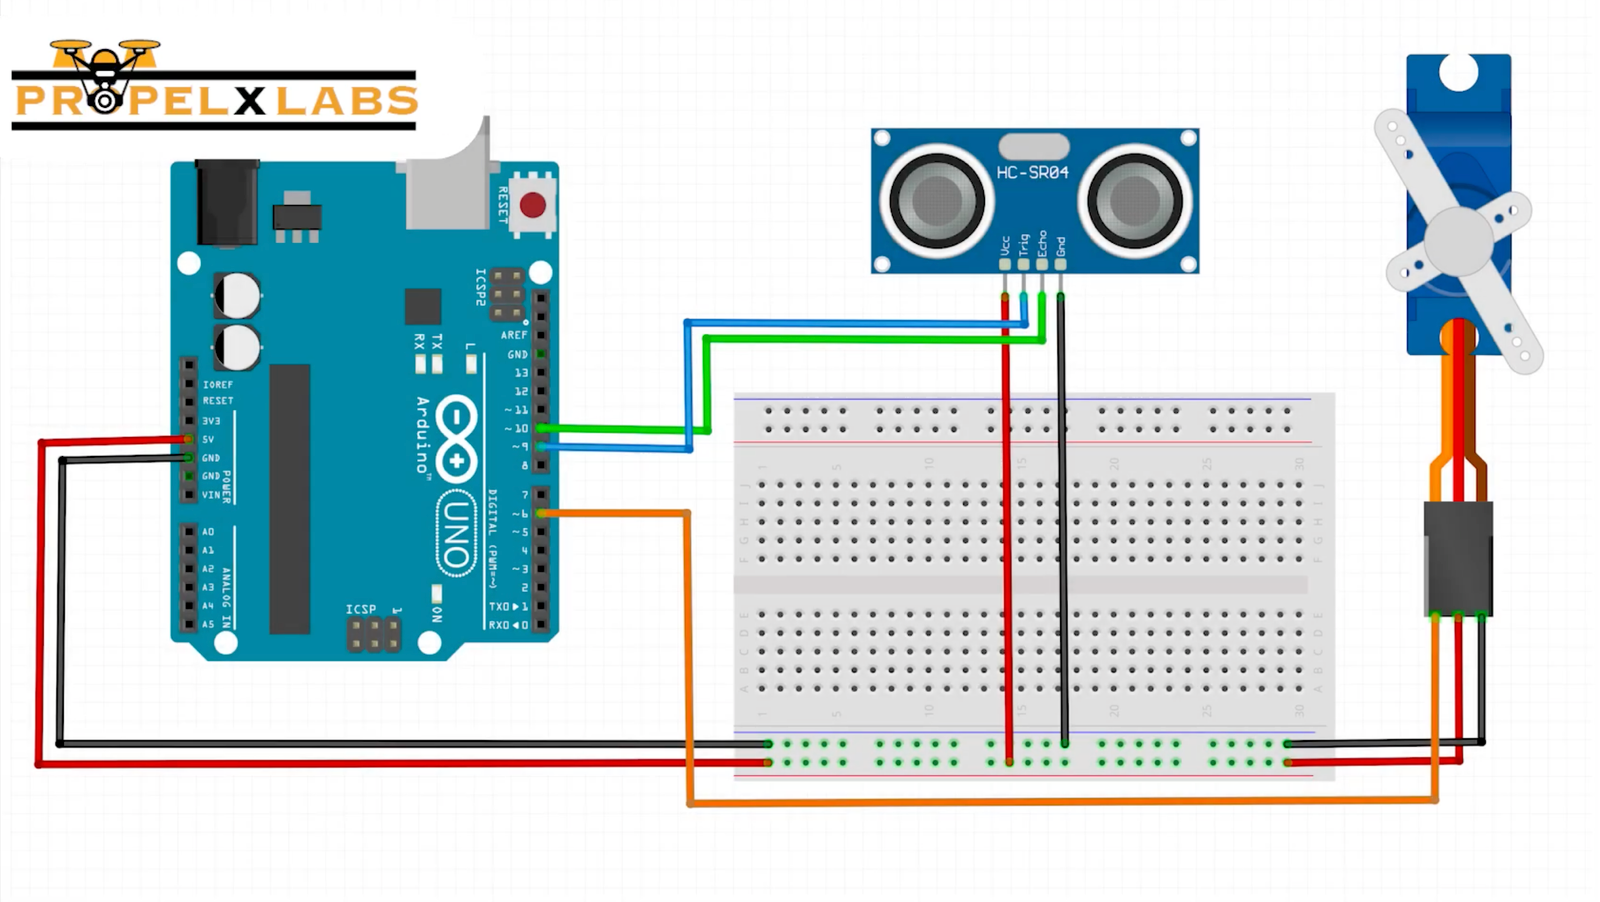
The ultrasonic sensor works by sending sound waves and measuring how long they take to bounce back. So it needs proper power and two signal pins connected to the Arduino. The servo motor, on the other hand, simply rotates based on the signal it receives from the Arduino.
Once everything is connected properly, all components share a common ground, which ensures the system runs smoothly without random errors or unstable behavior.
A clean wiring setup is very important here because even a small loose connection can cause incorrect distance readings or jerky servo movement.
Bringing the System to Life
This is the part where everything becomes intelligent. The Arduino program acts as the decision-maker for the entire system.
The ultrasonic sensor constantly measures distance in front of the gate. These readings are sent to the Arduino, which compares them with a predefined threshold value. If the object is closer than that limit, the system decides that it is time to open the gate.
The servo motor then rotates to lift the barrier. Once the object moves away and the distance increases again, the system waits briefly and then closes the gate.
This creates a smooth real-time automation effect that feels almost like a real smart security gate.
#include <Servo.h>

Servo gateServo;

const int trigPin = 9;
const int echoPin = 10;
const int servoPin = 6;

long duration;
int distance;
int threshold = 20;

void setup() {
  gateServo.attach(servoPin);
  pinMode(trigPin, OUTPUT);
  pinMode(echoPin, INPUT);
  Serial.begin(9600);
}

void loop() {
  digitalWrite(trigPin, LOW);
  delayMicroseconds(2);

  digitalWrite(trigPin, HIGH);
  delayMicroseconds(10);
  digitalWrite(trigPin, LOW);

  duration = pulseIn(echoPin, HIGH);
  distance = duration * 0.034 / 2;

  Serial.println(distance);

  if (distance > 0 && distance < threshold) {
    gateServo.write(90);
  } else {
    gateServo.write(0);
  }

  delay(200);
}Wrapping It All Together
What you have built here is not just a small Arduino project—it is a working model of how automation exists in the real world. From parking gates to secure entry systems, the same concept is used everywhere where machines need to respond without human involvement.
The ultrasonic sensor acts like the eyes of the system, while the servo motor becomes the hand that performs the action. The Arduino sits in the middle, making all the decisions in real time.
Once you see the gate opening and closing automatically, it becomes very clear how simple components can be combined to create intelligent behavior.
Where This Can Go Next
This project is just the starting point. In real applications, systems like this are often upgraded with RFID access, password-based entry, or even IoT monitoring so that gate activity can be tracked remotely.
With a few additions, this simple model can be turned into a fully functional smart parking system or security prototype.
🎬 SUBMISSION TASK
Now it’s your turn to take this project further.
Build your own version of the automatic barrier gate, test it, and record a short video showing it in action. Try to make it clear and simple so we can see how your system responds when an object comes close to the sensor.
Once your video is ready, upload it to YouTube and paste the link below. This helps you showcase your work like a real engineering project.